I?ve been asked to do a build thread of my recently completed M2 Clone amplifier. So, here goes?
The M2 is a FirstWatt stereo Class A amplifier designed by Nelson Pass. It delivers 25 Watts per channel into 8 Ohm and 40 Watts into 4 Ohm.
More info:
Product Manual: https://www.firstwatt.com/pdf/prod_m2_man.pdf
Tea-bag?s Blog: https://www.diyaudio.com/archive/blogs/tea-bag/203-m2clone-boards-120mm-ums-spacing.html
diyAudio thread: https://www.diyaudio.com/community/threads/official-m2-schematic.281520
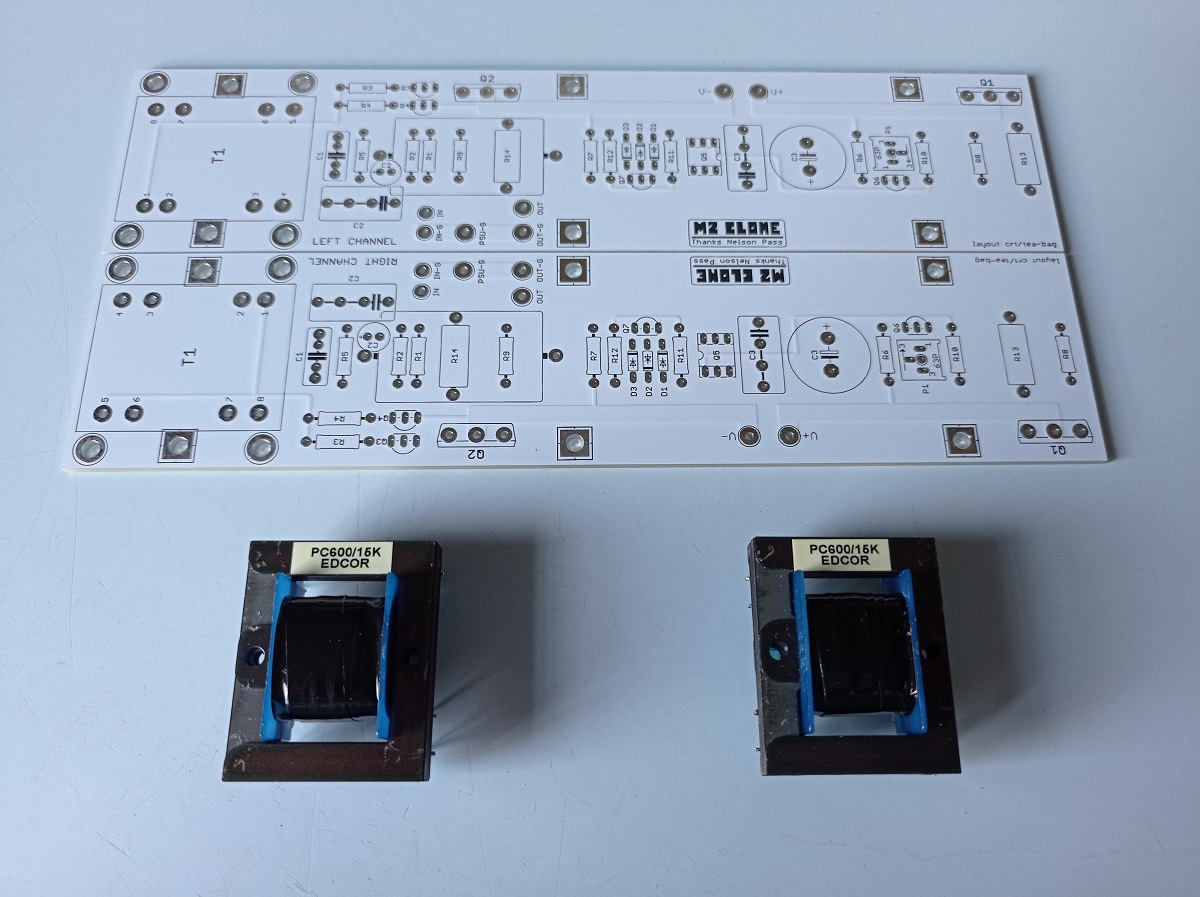
A few years ago, the M2 clone PCB?s and Edcor auto-formers were purchased from diyAudio member Tea-bag. When he offered Harris NOS IRFP9240s Mosfets, I jumped at the opportunity.
Incidently, Mark Johnson?s version of the M2, which is called M2x, was announced the same day that I placed my order for Tea-bag?s boards.
The M2x offers swapable input stage boards with different topologies and components to overcome the problem of the unobtanium Toshiba Jfets that are used in many FirstWatt amp designs. But in reality, if you installed the Ishikawa input stage in the M2x, then you have the original M2 as Mr Pass designed it, because the Ishikawa uses the 2SK170 & 2SJ74 transistor pair. The diyAudio Store now sells LSK170 & LSJ74 by Linear Systems which are basically the same thing as the Toshiba?s, though.
At first, I was a bit disappointed that I didn?t get a chance to decide between getting the M2 clone and the M2x, but after a while I started appreciating the fact that I?ll be building almost an exact copy of Nelson Pass? M2 amplifier. I want to own and listen to, exactly what the ?Master? had designed and sold for $3,600 (about R54,000) when it was available commercially.
I bought a handful of 2SK170 Jfets a few years ago when it was still freely available locally at Communica and other stores. At the time I measured the Idss of each one and sorted them into matching pairs and also a matched quad for my first Pass build ? a B1 buffer preamp. The M2 uses complimentary 2SJ74 Jfets and after verifying on diyAudio that he doesn?t sell fake transistors, I imported two of matching Idss from Spencer in Singapore. They were rather costly, but a neccesity for the M2 build. www.fetaudio.com
I spent a lot of time on the BOM ? comparing the original BOM with what Mark Johnson suggested for the M2x and reading what other diyAudio members like 6L6 and XRK971 said and suggested. I?m confident that I?ve used good quality components throughout; e.g. Elna Silmic II, Cornell Dubilier and Wima capacitors, YAGEO and KAO Speer resistors, etc.
Most components were supplied by TRX Electronics in Moreleta Park, Pretoria. They import through Mouser and TTI at reasonable prices. There are also branches in Durban and Cape Town. https://trxe.com
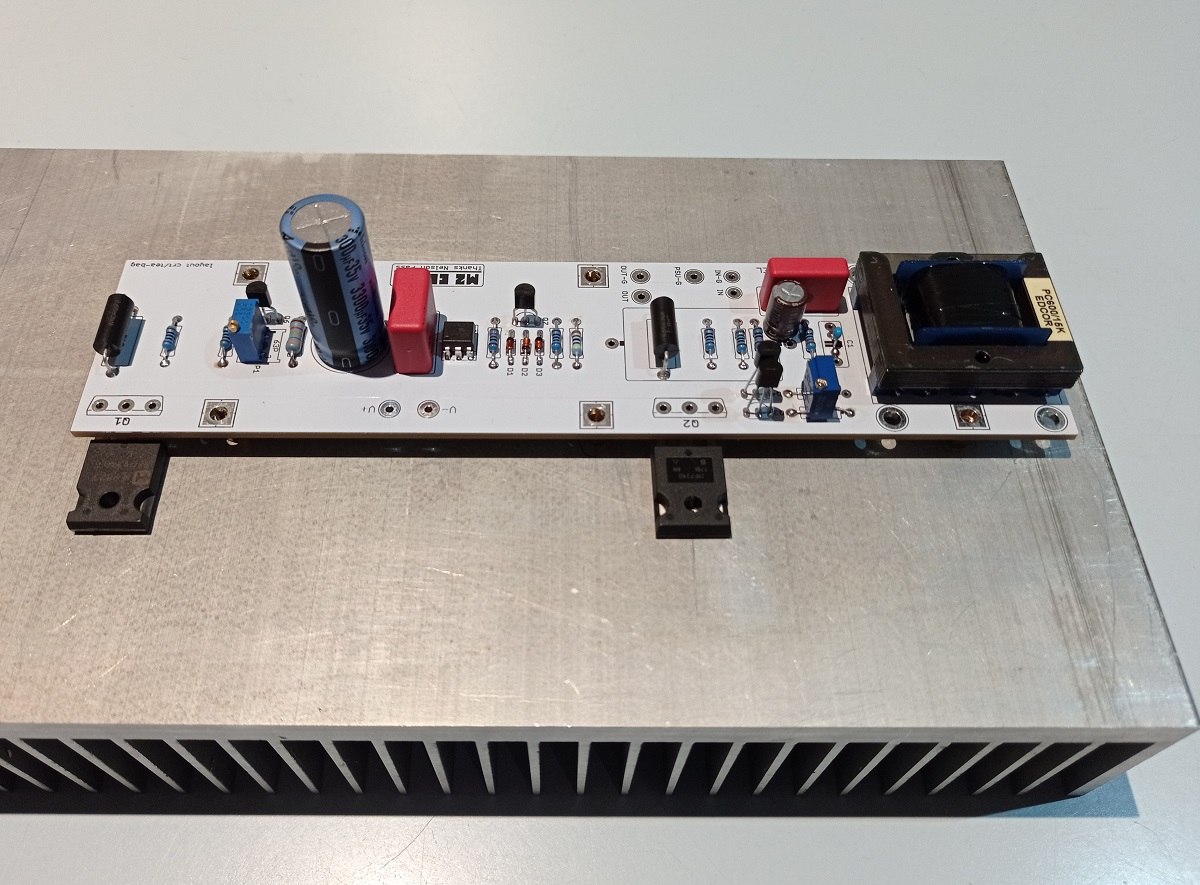
One of the stuffed boards on a fresh heatsink.
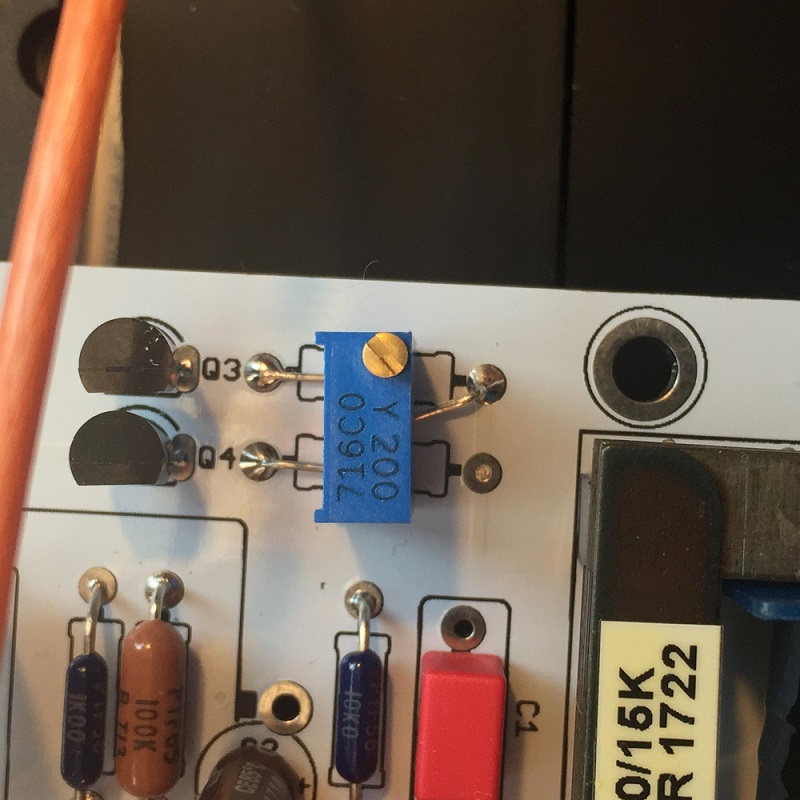
I saw a neat little trick in the M2x thread on diyAudio and incorporated it in my build. In what is known as the ?R3, R4 trimpot hack?, a 12-turn, 20 Ohm trimpot is installed in place of R3 and R4 to take care of slight Jfet mismatches. It?s simple and effective.
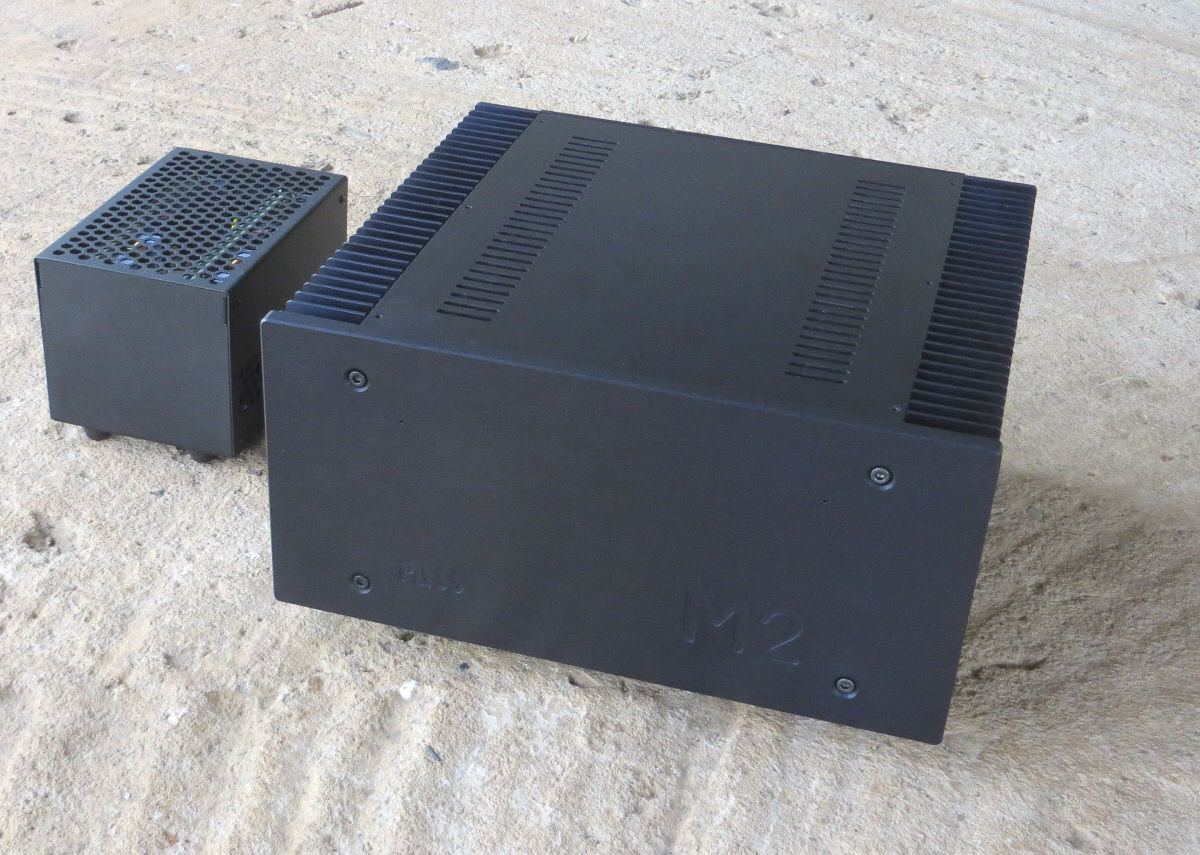
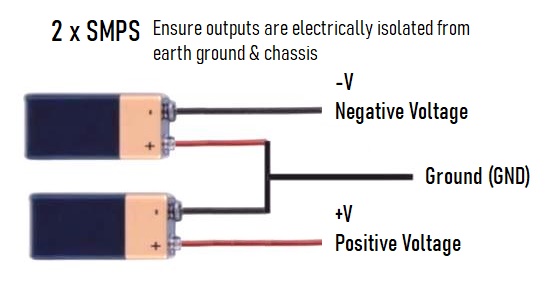
One thing that stood out for me about the M2, was that hum is usually a problem in amps that use auto-formers, e.g. the M2 and the F6. This is due to the auto-former being in close proximity to the power transformer which is normally housed in the same enclosure. Some amp builders had good results with mu-metal shielding, turning the power transformer on its side, and various other tricks. But I decided to do away with the source of the interference altogether, by placing the power supply externally. I went one step further and instead of a toroidal transformer, I used two Switched-Mode Power Supplies (SMPS) in series with a center ground tap to provide Pos (+) 24V and Neg (-) 24V. Keeping the PSU outside the amp enclosure paid off, because the amp is totally quiet. There is no audible hiss or hum with my ear right next to the cone of 100dB speaker drivers.
The diagram below shows how to connect two single voltage power supplies for Pos and Neg voltage.
As part of the power supply, but mounted inside the amp enclosure, I also employed two Cap Multipliers designed by Mark Johnson and Gtose with layout by Prasi (diyAudio). https://www.diyaudio.com/forums/power-supplies/297921-jumas-easy-peasy-capacitance-multiplier-post5510507.html
Cap Mx?s provide about 100dB channel separation while using the same PSU for both channels. It effectively becomes two monoblock amplifiers in the same enclosure. The evidence is in the superb soundstage and imaging that this amp delivers.
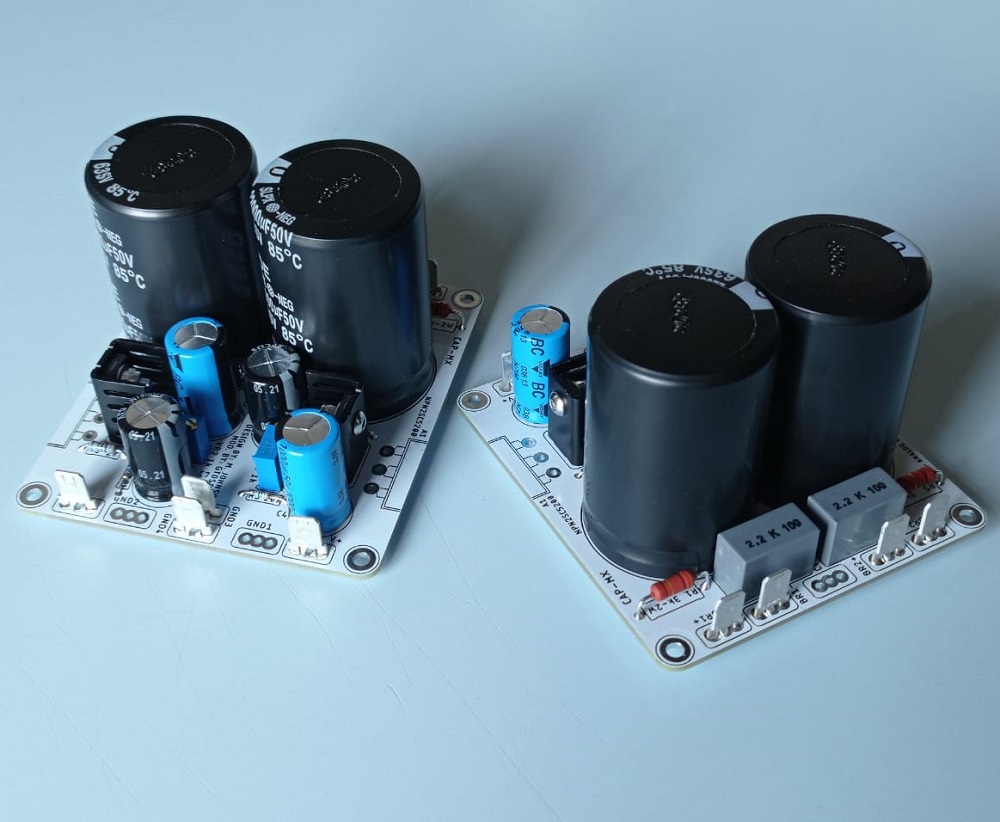
Testing the SMPS?s and Cap Mx?s.
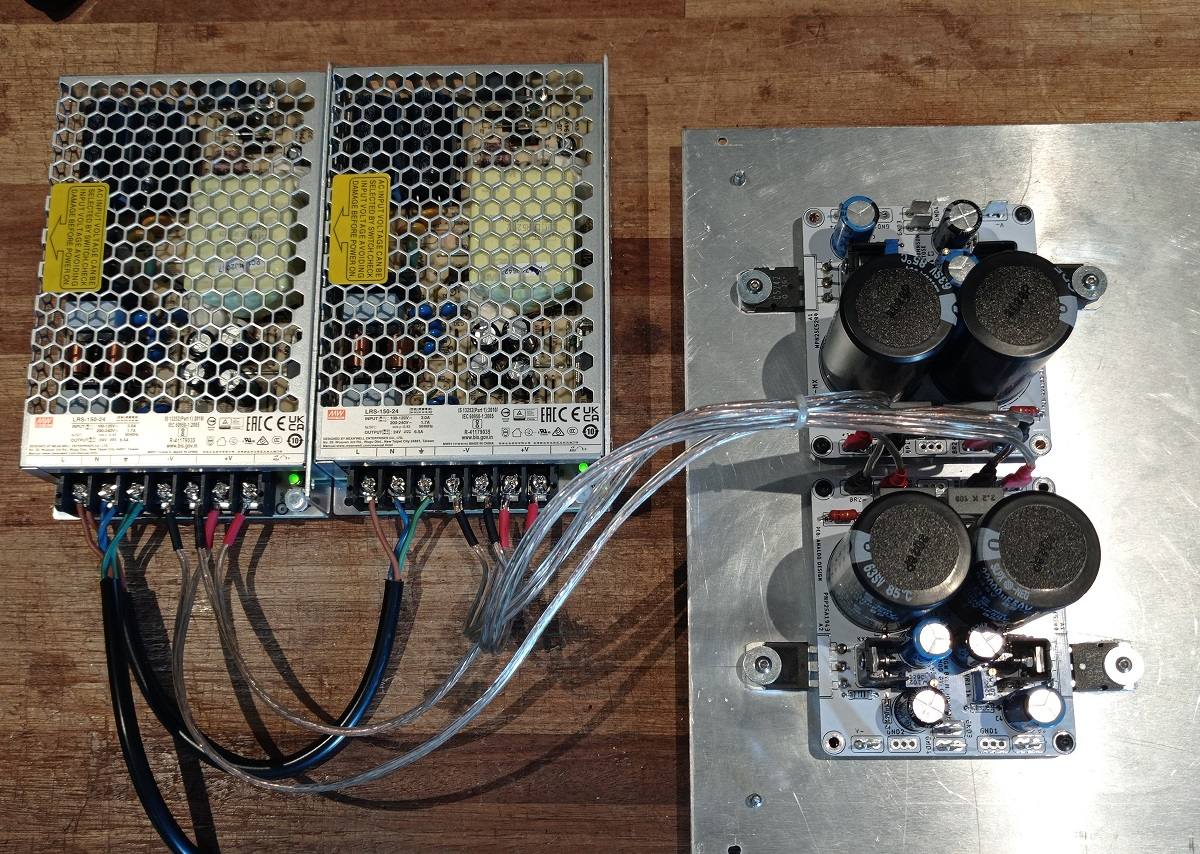
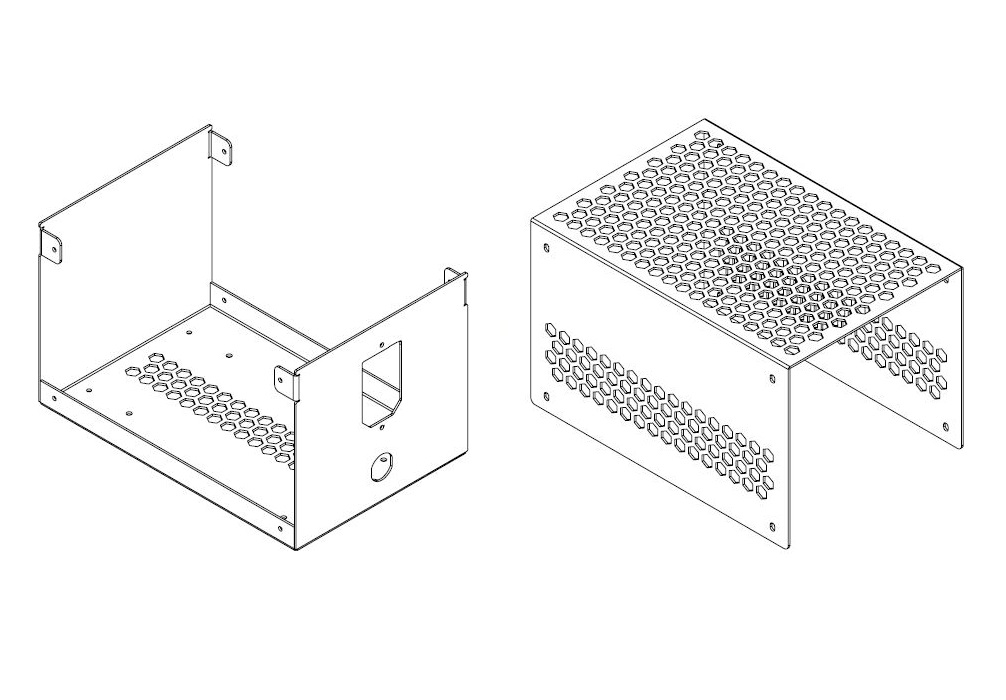
Eezi-laser in Koedoespoort, Pretoria made the custom PSU enclosure from CAD drawings that I provided. The two SMPS are mounted on their sides to ensure a compact and neat form factor.
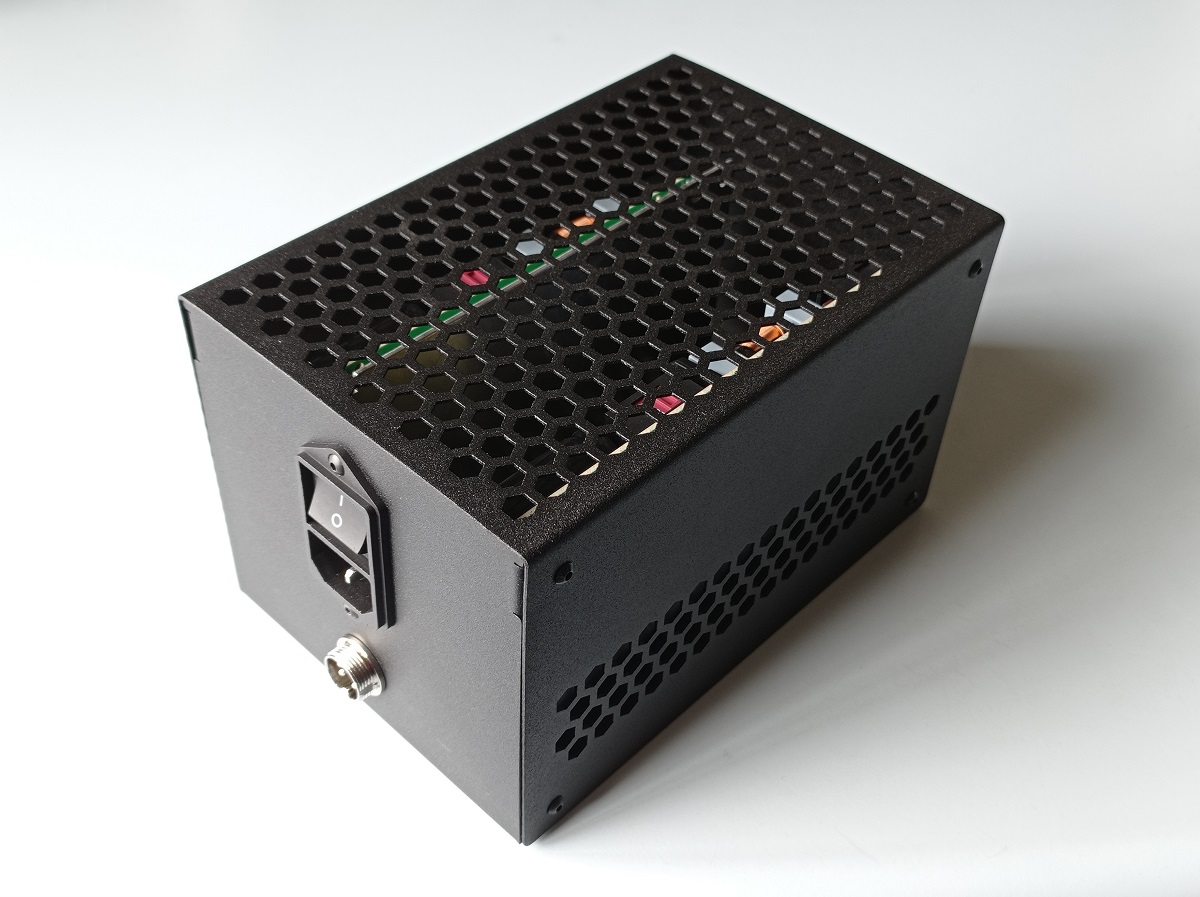
3D CAM drawing of the laser cut and powder coated PSU enclosure made from 1.2mm mild steel.
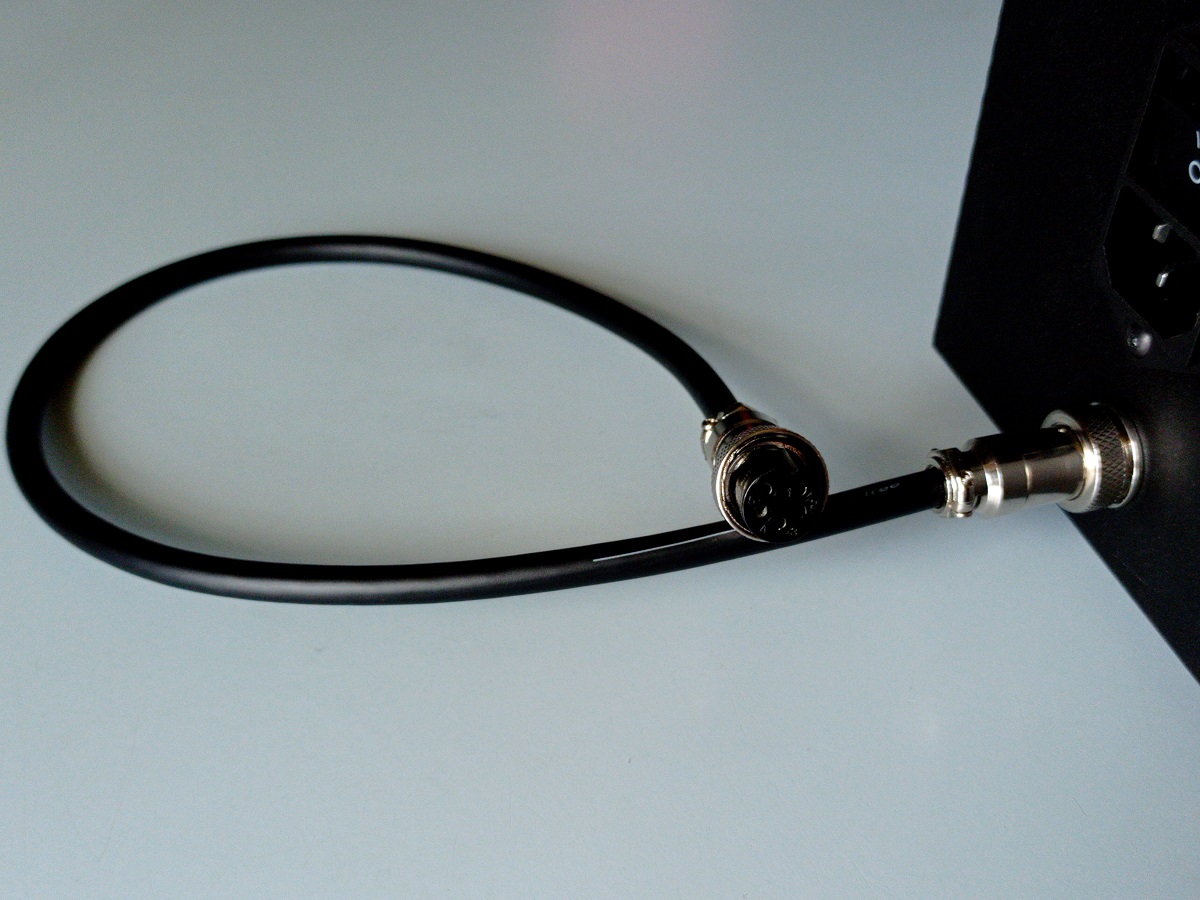
The umbilical cord is 500mm long with female connectors on both sides.
I like documenting my builds so that if I, or someone else ever need to do repairs, enough information is available to work from.
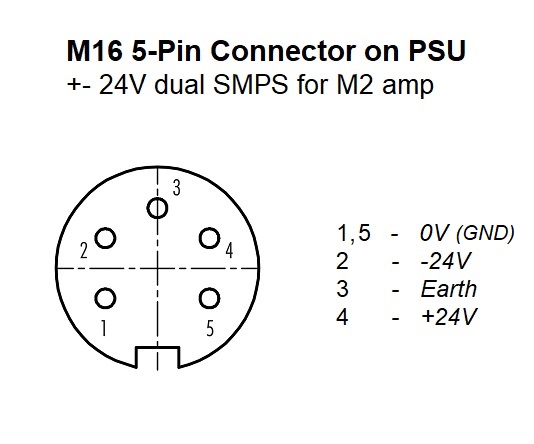
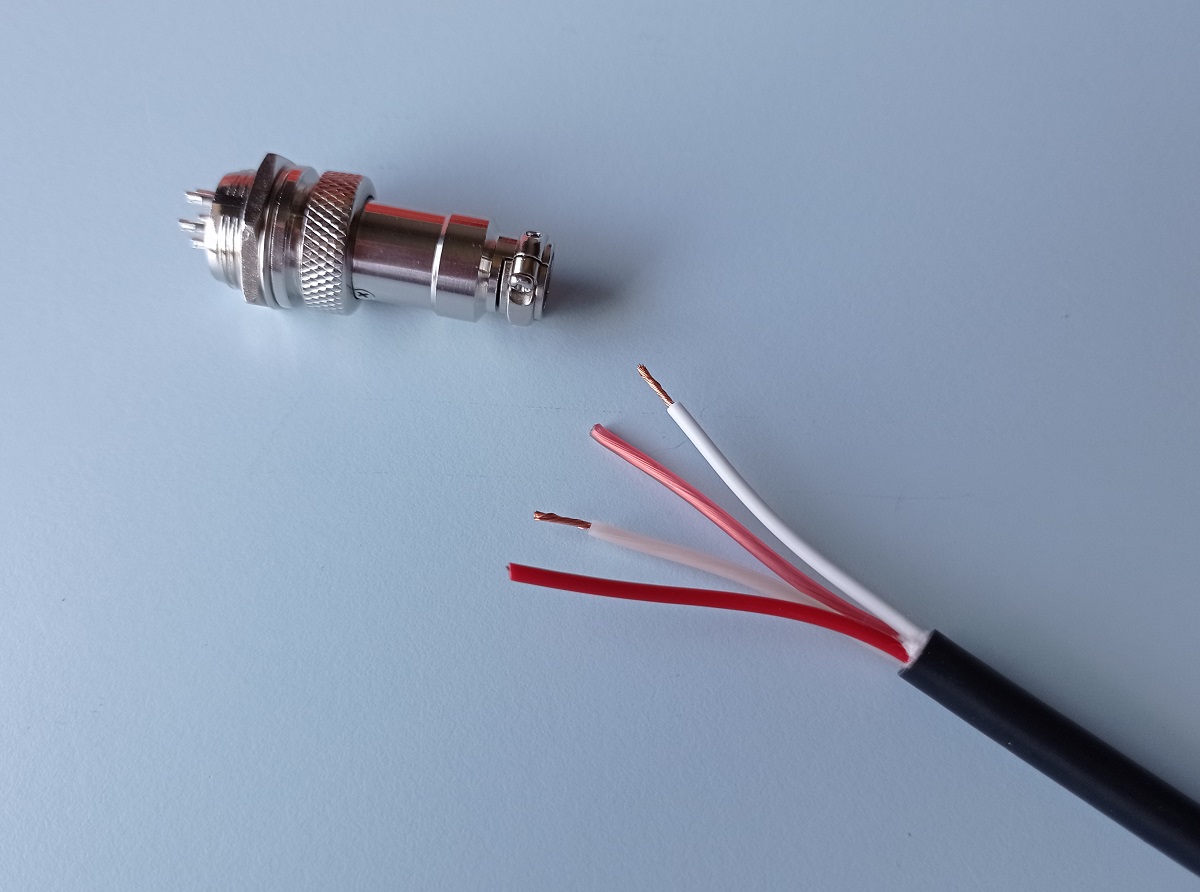
The 4-core power cable is Japanese quality Tachii T-4S6 with M16 audio connectors. The pins are rated at 5A each. One pin provides an Earth connection to the chassis for safety.
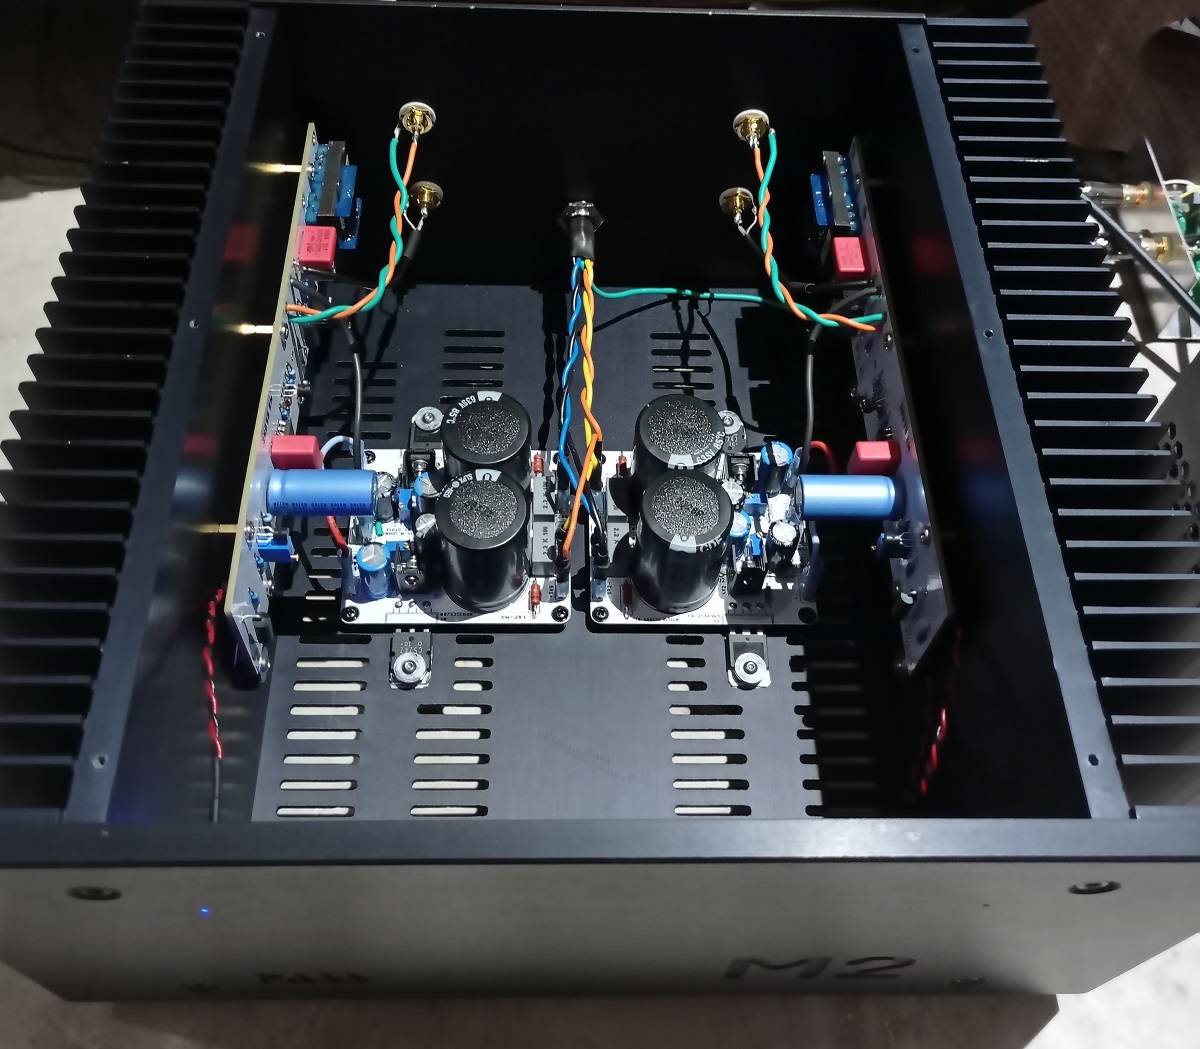
Good layout planning helps to keep the wiring neat. The Cap Mx?s are mounted on the custom designed bottom plate with provision made for mounting the Mosfets.
I managed to buy the last two lengths of 300 x 51.5 Zenli heatsinks from Mantech and had it cut up and machined into 160mm tall pieces. It?s the perfect size for a 25 Watt Class A amp. The heatsinks have a thermal coefficient of 0.3 K/W and the M2 runs at only 23 degrees above ambient temperature. That means even if room temperature goes up into the high 20?s, the amp will never go above 50 degrees.
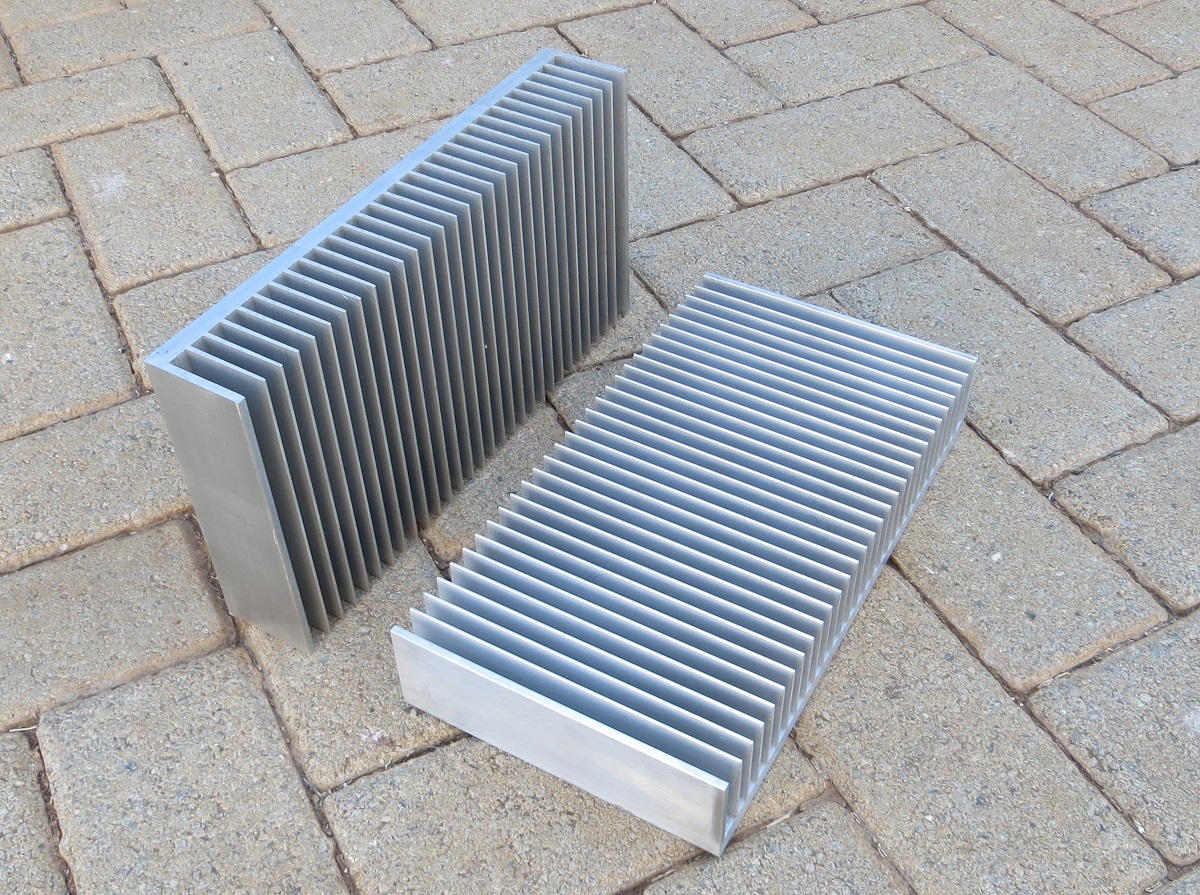
I just love the sight of freshly machined heatsinks. One of the things I like about the Zenli extrusions is the relatively thick web. It helps thermal transfer and lowers the thermal coefficient considerably (lower is better), compared to other heatsinks with thinner webs, but otherwise similar dimensions.
The aluminium bits before it was anodized by Designed Anodizing in Robertville, Florida.
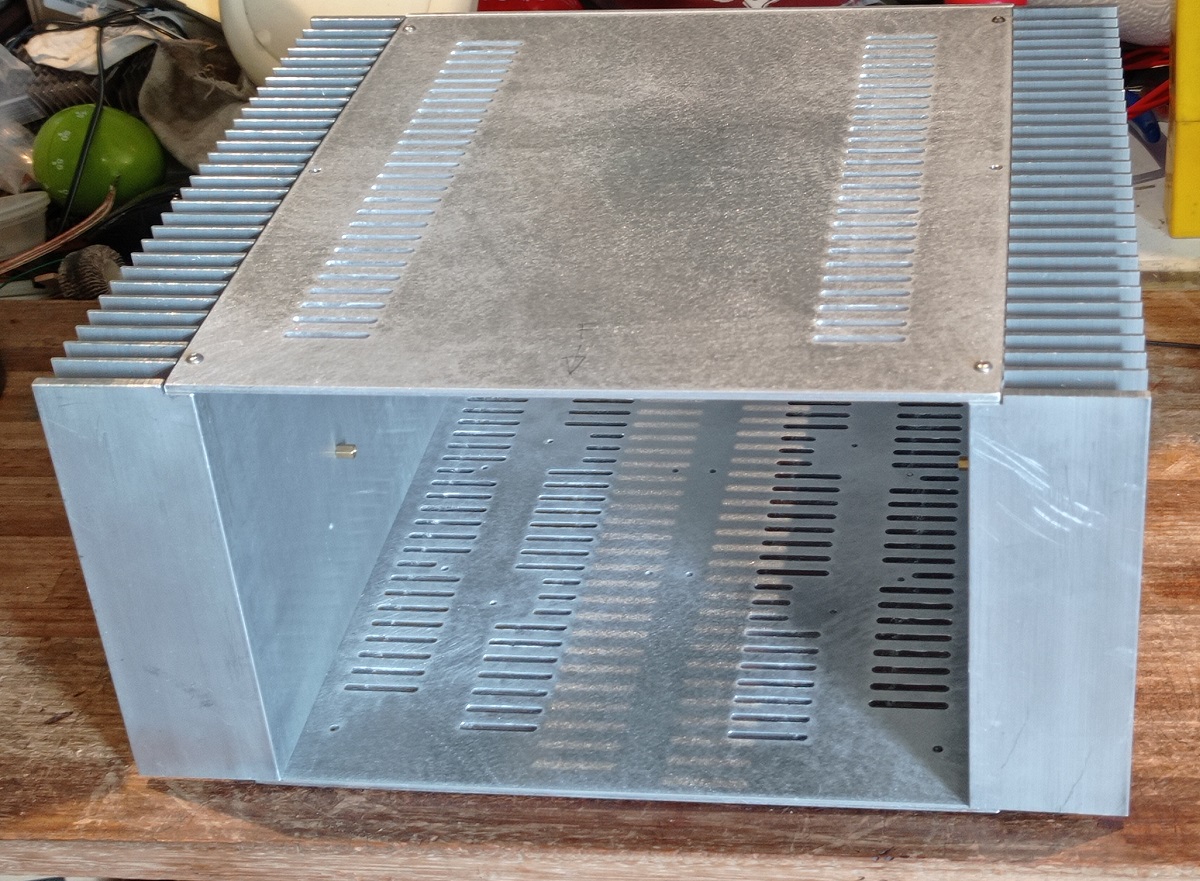
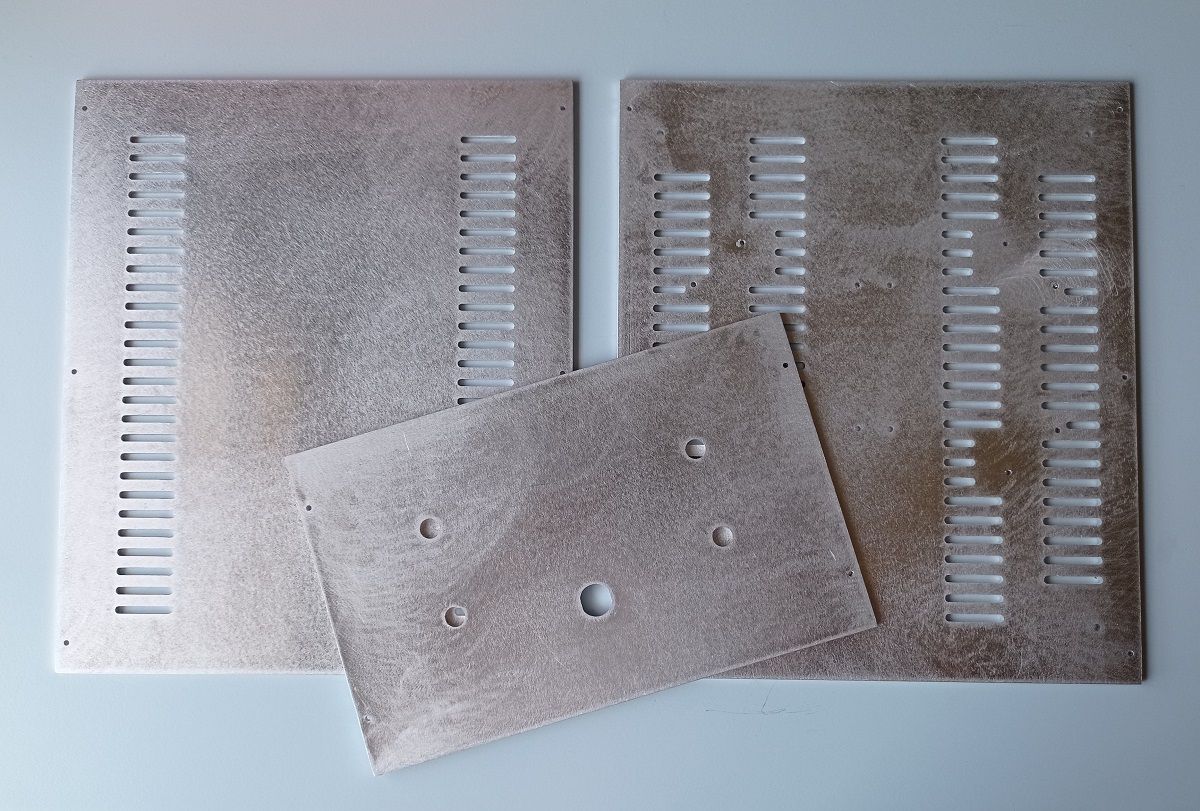
Eezi-laser also cut the 3mm top, bottom and rear panels.
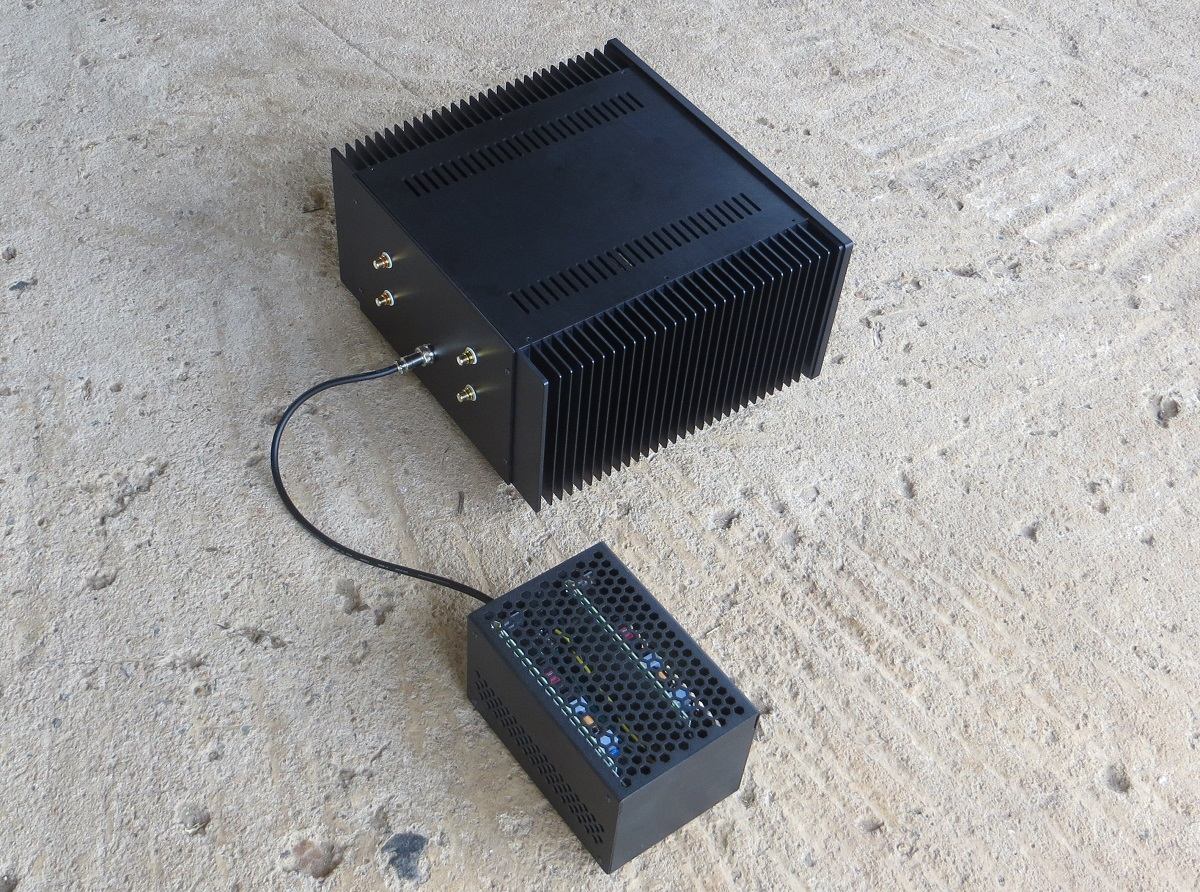
The completed M2 amplifier.
Time to enjoy and appreciate a world-class amplifier?
The M2 is a FirstWatt stereo Class A amplifier designed by Nelson Pass. It delivers 25 Watts per channel into 8 Ohm and 40 Watts into 4 Ohm.
More info:
Product Manual: https://www.firstwatt.com/pdf/prod_m2_man.pdf
Tea-bag?s Blog: https://www.diyaudio.com/archive/blogs/tea-bag/203-m2clone-boards-120mm-ums-spacing.html
diyAudio thread: https://www.diyaudio.com/community/threads/official-m2-schematic.281520
A few years ago, the M2 clone PCB?s and Edcor auto-formers were purchased from diyAudio member Tea-bag. When he offered Harris NOS IRFP9240s Mosfets, I jumped at the opportunity.
Incidently, Mark Johnson?s version of the M2, which is called M2x, was announced the same day that I placed my order for Tea-bag?s boards.
The M2x offers swapable input stage boards with different topologies and components to overcome the problem of the unobtanium Toshiba Jfets that are used in many FirstWatt amp designs. But in reality, if you installed the Ishikawa input stage in the M2x, then you have the original M2 as Mr Pass designed it, because the Ishikawa uses the 2SK170 & 2SJ74 transistor pair. The diyAudio Store now sells LSK170 & LSJ74 by Linear Systems which are basically the same thing as the Toshiba?s, though.
At first, I was a bit disappointed that I didn?t get a chance to decide between getting the M2 clone and the M2x, but after a while I started appreciating the fact that I?ll be building almost an exact copy of Nelson Pass? M2 amplifier. I want to own and listen to, exactly what the ?Master? had designed and sold for $3,600 (about R54,000) when it was available commercially.
I bought a handful of 2SK170 Jfets a few years ago when it was still freely available locally at Communica and other stores. At the time I measured the Idss of each one and sorted them into matching pairs and also a matched quad for my first Pass build ? a B1 buffer preamp. The M2 uses complimentary 2SJ74 Jfets and after verifying on diyAudio that he doesn?t sell fake transistors, I imported two of matching Idss from Spencer in Singapore. They were rather costly, but a neccesity for the M2 build. www.fetaudio.com
I spent a lot of time on the BOM ? comparing the original BOM with what Mark Johnson suggested for the M2x and reading what other diyAudio members like 6L6 and XRK971 said and suggested. I?m confident that I?ve used good quality components throughout; e.g. Elna Silmic II, Cornell Dubilier and Wima capacitors, YAGEO and KAO Speer resistors, etc.
Most components were supplied by TRX Electronics in Moreleta Park, Pretoria. They import through Mouser and TTI at reasonable prices. There are also branches in Durban and Cape Town. https://trxe.com
One of the stuffed boards on a fresh heatsink.
I saw a neat little trick in the M2x thread on diyAudio and incorporated it in my build. In what is known as the ?R3, R4 trimpot hack?, a 12-turn, 20 Ohm trimpot is installed in place of R3 and R4 to take care of slight Jfet mismatches. It?s simple and effective.
One thing that stood out for me about the M2, was that hum is usually a problem in amps that use auto-formers, e.g. the M2 and the F6. This is due to the auto-former being in close proximity to the power transformer which is normally housed in the same enclosure. Some amp builders had good results with mu-metal shielding, turning the power transformer on its side, and various other tricks. But I decided to do away with the source of the interference altogether, by placing the power supply externally. I went one step further and instead of a toroidal transformer, I used two Switched-Mode Power Supplies (SMPS) in series with a center ground tap to provide Pos (+) 24V and Neg (-) 24V. Keeping the PSU outside the amp enclosure paid off, because the amp is totally quiet. There is no audible hiss or hum with my ear right next to the cone of 100dB speaker drivers.
The diagram below shows how to connect two single voltage power supplies for Pos and Neg voltage.
As part of the power supply, but mounted inside the amp enclosure, I also employed two Cap Multipliers designed by Mark Johnson and Gtose with layout by Prasi (diyAudio). https://www.diyaudio.com/forums/power-supplies/297921-jumas-easy-peasy-capacitance-multiplier-post5510507.html
Cap Mx?s provide about 100dB channel separation while using the same PSU for both channels. It effectively becomes two monoblock amplifiers in the same enclosure. The evidence is in the superb soundstage and imaging that this amp delivers.
Testing the SMPS?s and Cap Mx?s.
Eezi-laser in Koedoespoort, Pretoria made the custom PSU enclosure from CAD drawings that I provided. The two SMPS are mounted on their sides to ensure a compact and neat form factor.
3D CAM drawing of the laser cut and powder coated PSU enclosure made from 1.2mm mild steel.
The umbilical cord is 500mm long with female connectors on both sides.
I like documenting my builds so that if I, or someone else ever need to do repairs, enough information is available to work from.
The 4-core power cable is Japanese quality Tachii T-4S6 with M16 audio connectors. The pins are rated at 5A each. One pin provides an Earth connection to the chassis for safety.
Good layout planning helps to keep the wiring neat. The Cap Mx?s are mounted on the custom designed bottom plate with provision made for mounting the Mosfets.
I managed to buy the last two lengths of 300 x 51.5 Zenli heatsinks from Mantech and had it cut up and machined into 160mm tall pieces. It?s the perfect size for a 25 Watt Class A amp. The heatsinks have a thermal coefficient of 0.3 K/W and the M2 runs at only 23 degrees above ambient temperature. That means even if room temperature goes up into the high 20?s, the amp will never go above 50 degrees.
I just love the sight of freshly machined heatsinks. One of the things I like about the Zenli extrusions is the relatively thick web. It helps thermal transfer and lowers the thermal coefficient considerably (lower is better), compared to other heatsinks with thinner webs, but otherwise similar dimensions.
The aluminium bits before it was anodized by Designed Anodizing in Robertville, Florida.
Eezi-laser also cut the 3mm top, bottom and rear panels.
The completed M2 amplifier.
Time to enjoy and appreciate a world-class amplifier?