With the audio source world having moved on from vinyl (and back to vinyl) to tapes, and then to CD's and now all manner of streaming, I decided to enter this new world on a budget. My first attempt was using my laptop as a source, and as you can imagine my ears were not impressed. Most, if not all laptops have pretty poor native audio, so I decided to try a versatile USB-C DAC... enter the $99 Zorloo Ztella:
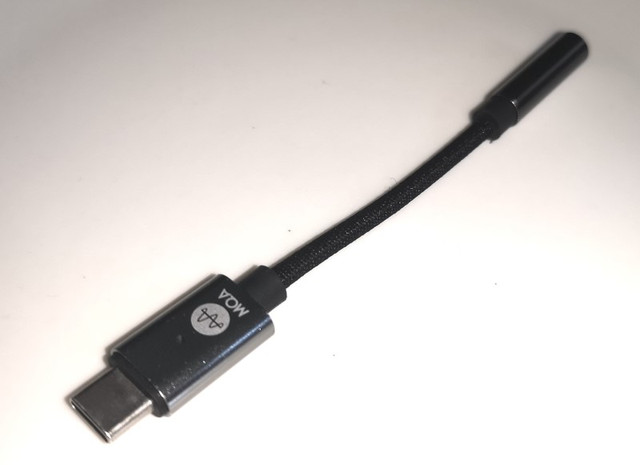
This DAC is actually pretty amazing for what it is. It's tiny and portable with all the electronic components fit in the USB-C plug and it's capable of processing/unfolding MQA format, which is great because I subscribe to Tidal. It's perfect for a cell phone with headphones for when you're on the move, but using it as your main hifi DAC is less than ideal for a number of reasons I won't go into now.
I started researching alternative budget DAC solutions online, and quickly learnt that it's possible to pair a Raspberry Pi with an audiophile grade DAC at a fraction of the cost of something turnkey like a Bluesound Node 2. I've always enjoyed a little hifi tinkering and decided to tackle the project.
So in the post I'll take you through the parts required, the rather simple construction of a audiophile grade Raspberry Pi DAC, as well as the installation and configuration of the streaming operating system and software to get the solution up and running. I'll list the cost of the hardware too, but you may be able to get same or your preferred equivalents cheaper.
PART 1:
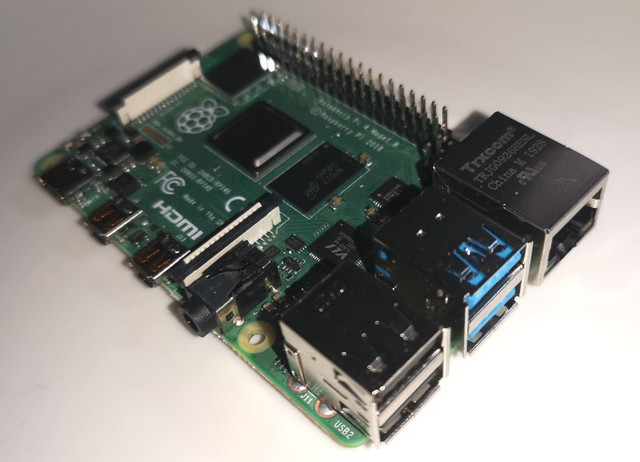
So for part 1, let's look at the parts... first you will need a Raspberry Pi4 small form board. I decided on the Pi4 because it includes a decent wifi chipset and has good CPU power and ram(4GB for the one I bought). Lesser spec'd Pi's may lead to stuttery music rendering so it's best to go with a decent one. The Pi board I bought local for just over R1100.
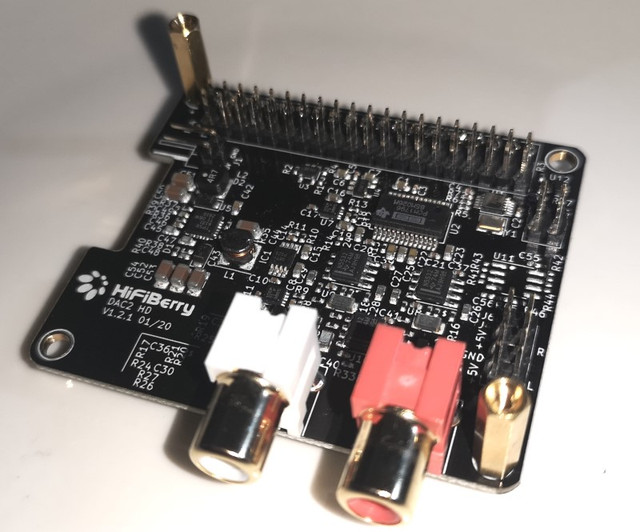
Next up the most important component, the DAC. Newer gen Raspberry Pi's allow for extending of their functionality via the installation of HAT (Hardware at the top) boards connected to their GPIO pins. There's a huge variety of HAT boards you can get for a Pi, with numerous makes and models of DAC's available too. Well known names include Justboom, HifiBerry, Allo Boss and IQ Audio. The decision of which HAT DAC board to buy was a tough and time consuming one, but eventually I settled on the Swiss manufactured Hifiberry DAC 2 HD. No it does not include support for MQA format, but it does utilise a dedicated 192kHz/24bit high-quality Burr-Brown DAC chip, which put it in a league above the cheaper options. I bought the Hifiberry board for $99 on Amazon.
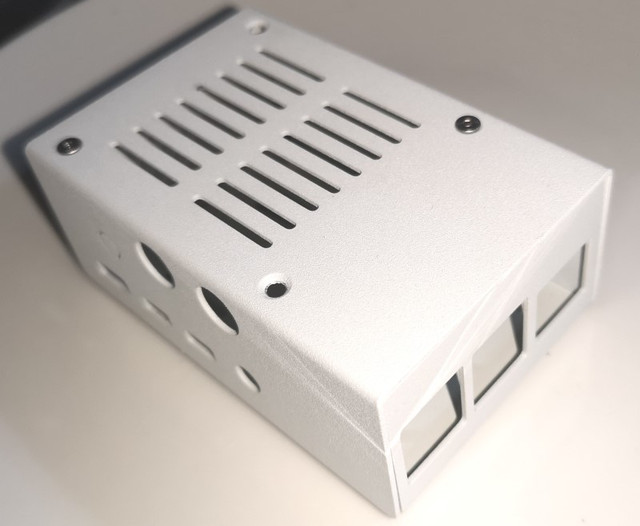
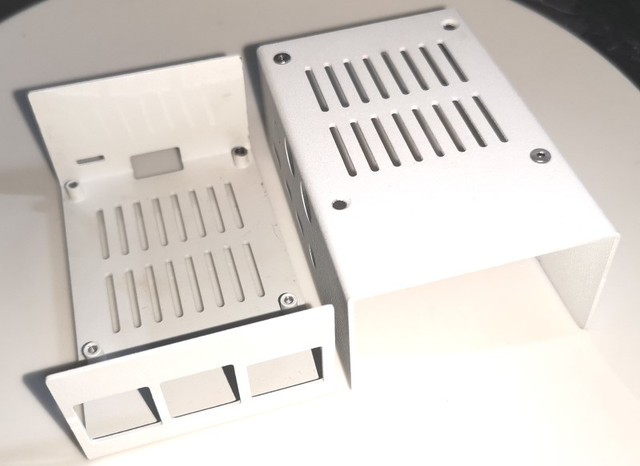
To house the components I also bought a Hifiberry steel casing on Amazon. I wanted black, but no stock. I can always respray the white one, but it probably won't be visible in the hifi cabinet anyways. Cost was $29.
The casing clips apart in two to allow installation of the PC boards:
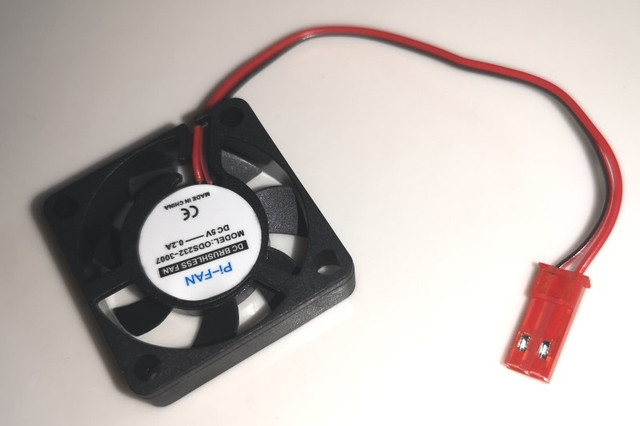
I bought a small cooling fan too, which ultimately was not required... the less noise the better I guess!
Tomorrow, for part 2 I'll take you through the easy assembly process, and then in part 3 we'll get to the choice of software, and the installation and configuration thereof.
Mr B
This DAC is actually pretty amazing for what it is. It's tiny and portable with all the electronic components fit in the USB-C plug and it's capable of processing/unfolding MQA format, which is great because I subscribe to Tidal. It's perfect for a cell phone with headphones for when you're on the move, but using it as your main hifi DAC is less than ideal for a number of reasons I won't go into now.
I started researching alternative budget DAC solutions online, and quickly learnt that it's possible to pair a Raspberry Pi with an audiophile grade DAC at a fraction of the cost of something turnkey like a Bluesound Node 2. I've always enjoyed a little hifi tinkering and decided to tackle the project.
So in the post I'll take you through the parts required, the rather simple construction of a audiophile grade Raspberry Pi DAC, as well as the installation and configuration of the streaming operating system and software to get the solution up and running. I'll list the cost of the hardware too, but you may be able to get same or your preferred equivalents cheaper.
PART 1:
So for part 1, let's look at the parts... first you will need a Raspberry Pi4 small form board. I decided on the Pi4 because it includes a decent wifi chipset and has good CPU power and ram(4GB for the one I bought). Lesser spec'd Pi's may lead to stuttery music rendering so it's best to go with a decent one. The Pi board I bought local for just over R1100.
Next up the most important component, the DAC. Newer gen Raspberry Pi's allow for extending of their functionality via the installation of HAT (Hardware at the top) boards connected to their GPIO pins. There's a huge variety of HAT boards you can get for a Pi, with numerous makes and models of DAC's available too. Well known names include Justboom, HifiBerry, Allo Boss and IQ Audio. The decision of which HAT DAC board to buy was a tough and time consuming one, but eventually I settled on the Swiss manufactured Hifiberry DAC 2 HD. No it does not include support for MQA format, but it does utilise a dedicated 192kHz/24bit high-quality Burr-Brown DAC chip, which put it in a league above the cheaper options. I bought the Hifiberry board for $99 on Amazon.
To house the components I also bought a Hifiberry steel casing on Amazon. I wanted black, but no stock. I can always respray the white one, but it probably won't be visible in the hifi cabinet anyways. Cost was $29.
The casing clips apart in two to allow installation of the PC boards:
I bought a small cooling fan too, which ultimately was not required... the less noise the better I guess!
Tomorrow, for part 2 I'll take you through the easy assembly process, and then in part 3 we'll get to the choice of software, and the installation and configuration thereof.
Mr B