I was asked by a longstanding friend to build speaker covers for a set of vintage BW 220 (circa 1988) speakers rescued from a bar.
Like all Diy adventures, it should have been a quick and easy. Needless to say, I discovered that fitting it in between other activities turned out to be somewhat of a challenge resulting in a occasional and ?gentle? WA reminder of when will the speakers be ready for delivery...
Some background:
http://www.audioreview.com/product/speakers/floorstanding-speakers/b-and-w/dm-220.html
https://www.gramophone.co.uk/editorial/review-bw-dm110-and-dm220-loudspeakers
The boxes arrived scratched and minus the facia's. The drivers looked good- much to my surprise the rubber surrounds were seemingly pristine ? everything suggested a good prognosis.
Looking inside the box revealed some dirt cheap wires but knowing the owner?s preference for well used virgin stock standard wires it was left as is.
First the frames were constructed from Meranti. Cutting 45 degree cuts with a handsaw is always a pain and I never seem to get it 100% correct. I added a strengthening block to each corner and the modus operandi was to glue a corner everyday after work and to let it stand overnight in a jig and glue the next corner the following day.
Once the frames were build I made a jig to hold each frame in safely position whilst I routered four indentations in each frame for the protruding bass drivers. Once that was done, four coats of dark varnish was added to each frame. Once sanded, each frame had a smooth semi plasticized surface to provide a good bonding surface for the glue.
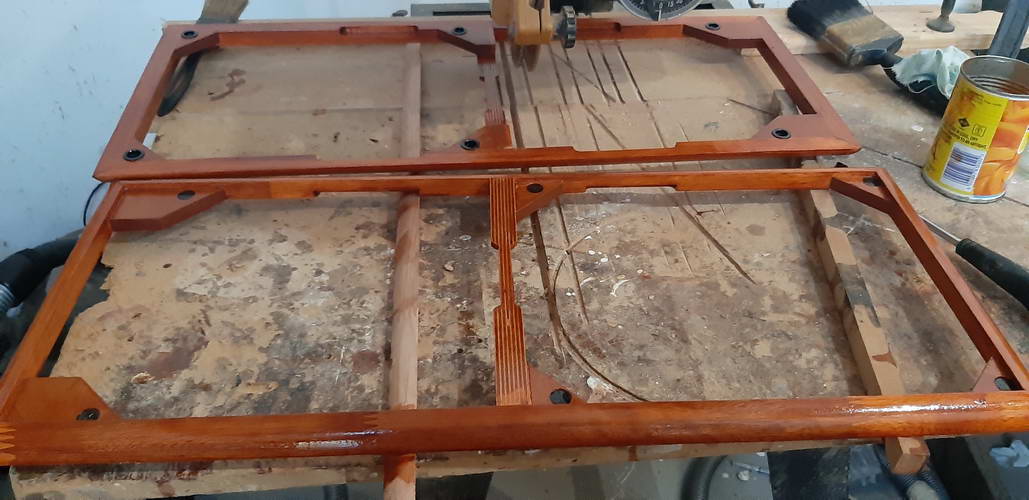
The most trickery part was drilling of the six female mounting holes into the frame- it had to drilled and it was important for the female black lugs to fit perfectly first time. Incorrectly placed holes could possibly required a frame rebuild as the female lugs had to be tight fitting not to pull out over time.
I parked the build whilst I explored my options. Eventually I opted to have a dart shaped steel plug milled. I placed the dart in the six existing facia lug holes in the box, positioned the frame on top and pressed down. The indentation made in the wood became the marker for the drill. It worked perfectly and accommodated the slight 2 mm size difference in boxes.
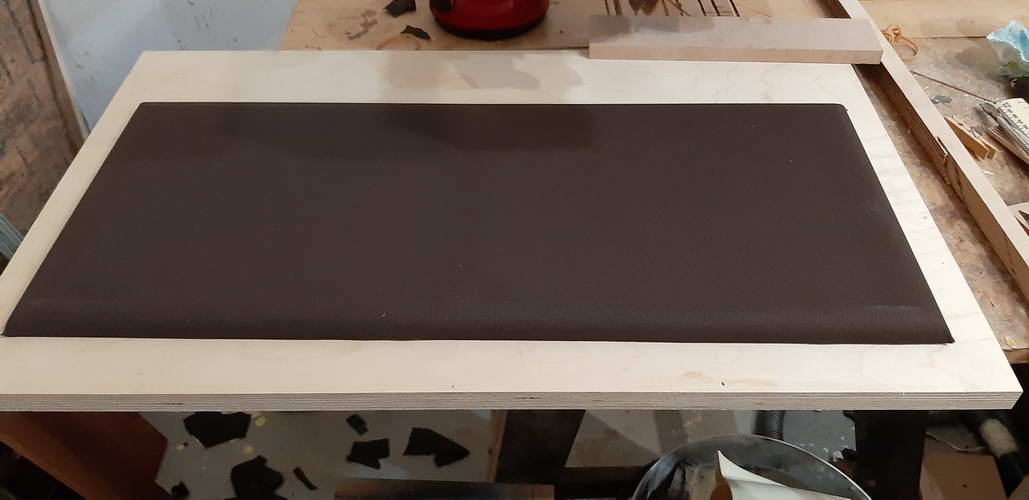
Adding the fabric:
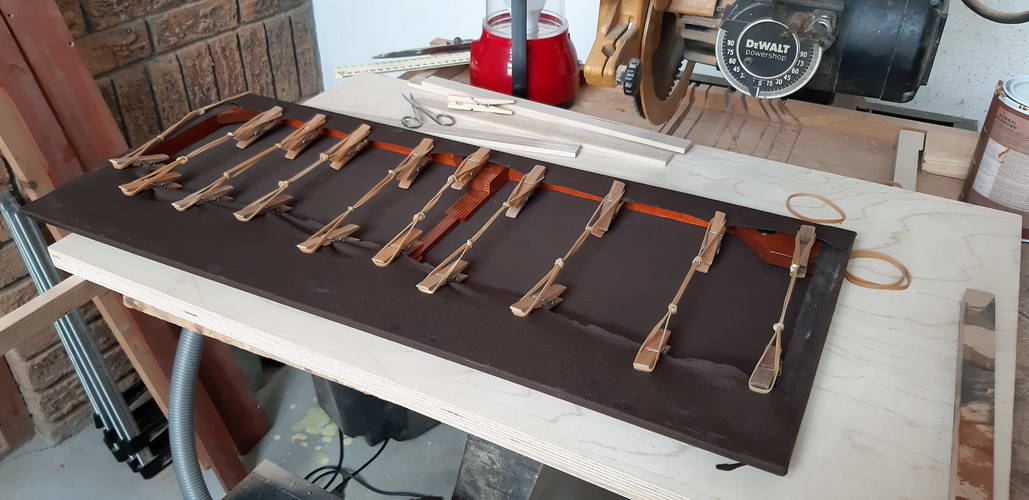
No nails were used to reduce the risk of splitting or weakening frames ? especially at the routered areas. The cloth was glued in two sessions per frame with a mild tension to get a wrinkle free look. I wanted the cloth soaked in glue where it was bonded to the frame. That required some care in preventing the glue from running onto the outer frame and staining the cloth in the visible front. I basically pre-tensioned the cloth, applied Genkem to the back of the frame and then folded the cloth over the edge letting it soak in the glue. It took about an hour to dry which provided met with the time window to do minor cloth positioning adjustments. To get an even stretch I used pegs and rubber rings.
 picture uploder
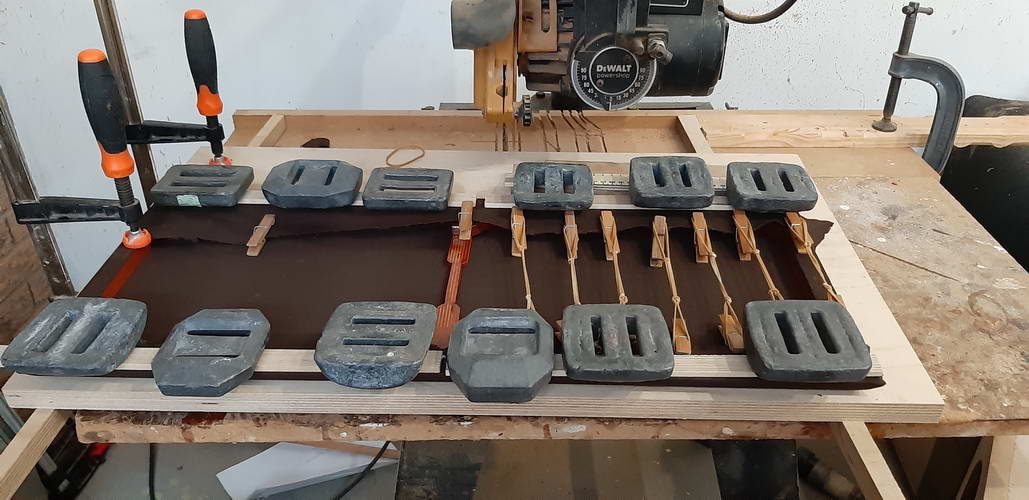
Once the cloth was glued into position I used left over strips of wood from another build to apply pressure on the folded cloth to ensure a tight bond to the frame. As expected the glue seeped through the cloth which meant that the strips had to be replaced every 30 min to prevent it from getting stuck to the cloth. I used diving weights which were perfect due to their compact size and substantial weight, to apply pressure to the wooden strips. Personal Note: Diving weights are excellent for applying pressure when you need to glue rubber sheeting in speaker boxes.
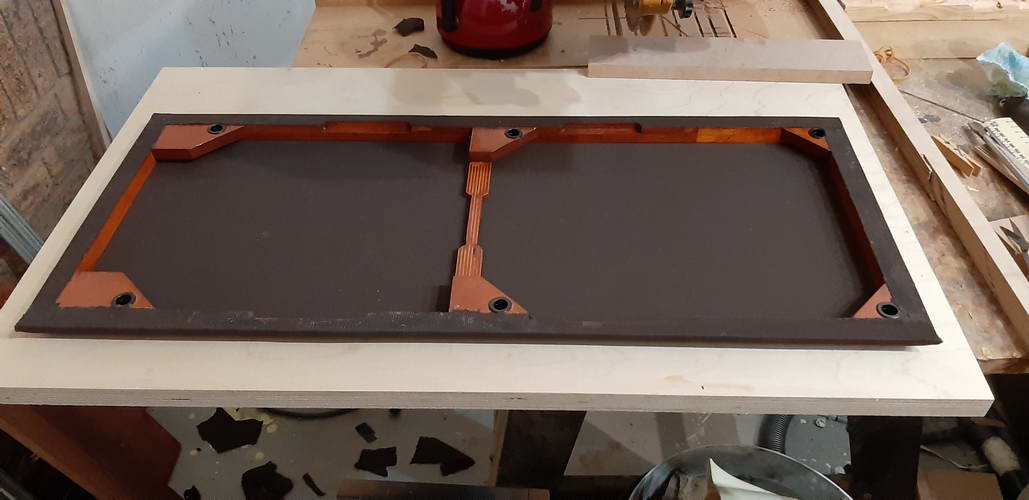
Once the glue was dry I used a surgical scissor to cut away the excess cloth.
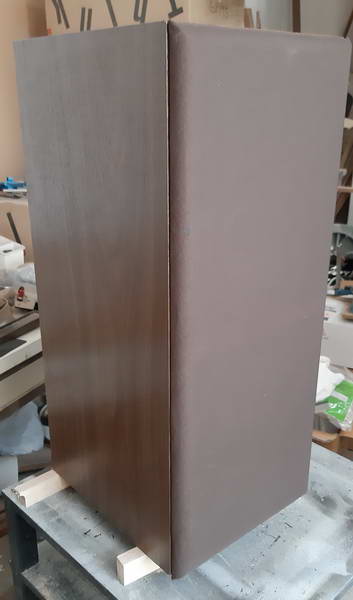
Box makeover
After 20+ years of use there were some visible scratches on the boxes, some holes in the sides from the wall mountings and various corner dings. I filled up the holes and dings with filler and once dry they were sanded down. The dirt and stains on the box sides was removed with a cloth doused in terps.
I gambled on applying a light brown shoe wax to each box and letting it stand for two days before I rubbed it off. Much to my surprise it worked perfectly- no visible signs of any scratches! I just love it when simple non expensive solutions provide excellent results !
For all practical purposes these speakers are now virtually brand new and ready to be loved again.
Hopefully the long wait by the owner, was worth it..
Notes to myself:
? No more private jobs until my own speaker build?s are done;
? As always lots of hidden cost and delays. Many thanks to Chrisc for assisting with importing the speaker cloth !
? With delicate work, be prepared for lots of glue and wait sessions.
? Never throw away spare wood cuts-off- they come in very handy and;
? Working at night is asking for trouble- Saturday mornings are much better?
Like all Diy adventures, it should have been a quick and easy. Needless to say, I discovered that fitting it in between other activities turned out to be somewhat of a challenge resulting in a occasional and ?gentle? WA reminder of when will the speakers be ready for delivery...
Some background:
http://www.audioreview.com/product/speakers/floorstanding-speakers/b-and-w/dm-220.html
https://www.gramophone.co.uk/editorial/review-bw-dm110-and-dm220-loudspeakers
The boxes arrived scratched and minus the facia's. The drivers looked good- much to my surprise the rubber surrounds were seemingly pristine ? everything suggested a good prognosis.
Looking inside the box revealed some dirt cheap wires but knowing the owner?s preference for well used virgin stock standard wires it was left as is.
First the frames were constructed from Meranti. Cutting 45 degree cuts with a handsaw is always a pain and I never seem to get it 100% correct. I added a strengthening block to each corner and the modus operandi was to glue a corner everyday after work and to let it stand overnight in a jig and glue the next corner the following day.
Once the frames were build I made a jig to hold each frame in safely position whilst I routered four indentations in each frame for the protruding bass drivers. Once that was done, four coats of dark varnish was added to each frame. Once sanded, each frame had a smooth semi plasticized surface to provide a good bonding surface for the glue.
The most trickery part was drilling of the six female mounting holes into the frame- it had to drilled and it was important for the female black lugs to fit perfectly first time. Incorrectly placed holes could possibly required a frame rebuild as the female lugs had to be tight fitting not to pull out over time.
I parked the build whilst I explored my options. Eventually I opted to have a dart shaped steel plug milled. I placed the dart in the six existing facia lug holes in the box, positioned the frame on top and pressed down. The indentation made in the wood became the marker for the drill. It worked perfectly and accommodated the slight 2 mm size difference in boxes.
Adding the fabric:
No nails were used to reduce the risk of splitting or weakening frames ? especially at the routered areas. The cloth was glued in two sessions per frame with a mild tension to get a wrinkle free look. I wanted the cloth soaked in glue where it was bonded to the frame. That required some care in preventing the glue from running onto the outer frame and staining the cloth in the visible front. I basically pre-tensioned the cloth, applied Genkem to the back of the frame and then folded the cloth over the edge letting it soak in the glue. It took about an hour to dry which provided met with the time window to do minor cloth positioning adjustments. To get an even stretch I used pegs and rubber rings.
picture uploderOnce the cloth was glued into position I used left over strips of wood from another build to apply pressure on the folded cloth to ensure a tight bond to the frame. As expected the glue seeped through the cloth which meant that the strips had to be replaced every 30 min to prevent it from getting stuck to the cloth. I used diving weights which were perfect due to their compact size and substantial weight, to apply pressure to the wooden strips. Personal Note: Diving weights are excellent for applying pressure when you need to glue rubber sheeting in speaker boxes.
Once the glue was dry I used a surgical scissor to cut away the excess cloth.
Box makeover
After 20+ years of use there were some visible scratches on the boxes, some holes in the sides from the wall mountings and various corner dings. I filled up the holes and dings with filler and once dry they were sanded down. The dirt and stains on the box sides was removed with a cloth doused in terps.
I gambled on applying a light brown shoe wax to each box and letting it stand for two days before I rubbed it off. Much to my surprise it worked perfectly- no visible signs of any scratches! I just love it when simple non expensive solutions provide excellent results !
For all practical purposes these speakers are now virtually brand new and ready to be loved again.
Hopefully the long wait by the owner, was worth it..
Notes to myself:
? No more private jobs until my own speaker build?s are done;
? As always lots of hidden cost and delays. Many thanks to Chrisc for assisting with importing the speaker cloth !
? With delicate work, be prepared for lots of glue and wait sessions.
? Never throw away spare wood cuts-off- they come in very handy and;
? Working at night is asking for trouble- Saturday mornings are much better?