Introduction
I've been on the forums a good almost-month now. In that time I've fallen in love with all the great people here. :thumbs: Now I've decided to give back, as simple as it may be.
I know a lot of you prefer Linux / FreeNas for home servers. I too think it's more optimized and streamlined than Windows, but I've got a dad, who is forty, dos and that's that. So when he asked me to build us a home server it had to be running Windows.
Warning: Since this forum doesn't have a hide markup, or I simply cannot find it, this post is full of pictures.
Server Hardware Setup
Our server really isn't anything crazy. Not even an Core i3. The build cost us R3020 without Harddrives. I ordered all of the parts from takealot.com and two days later a huge box arrived. :rubhands:
To see the full build check my Youtube video: (Try not to laugh) Build a Home Server! [Part 1: The Build]
If you're not brave enough check out the part list:
We added the following drives:
Why I chose these parts:
CPU: Fast enough, low power consumption.
Motherboard: Quality seems good for the price. (Came with 2 SATA cables, perfect for the budget)
RAM: Enough for now, easy to upgrade.
SSD: Cheap, and quick. Not the best physical build though, very plasticy.(Not like you're playing cricket with it though?)
Case: Thermaltake's PSU's aren't bad, chose the case because I knew it didn't come with some Chinese PSU. Space for 6HDDs, 10 if converters are added.
Server Software Setup
So this is what you're actually here for, right? You should know, the Server is in a corner of an mostly unused room. Plugged into the router (Netgear 2200) and power cable, no monitor, using Remote Desktop Connection.
Basics of the software we're running:
How are Drives are utilized:
SSD: OS Install
Drive 1 (4TB): Media (Movies, Series, Animations, Home Movies, Music Videos)
Drive 2 (1TB) External: Music + Client Computer Backups
Drive 3 (1TB) Internal: Backup of: Drive 2 + Home Movies + Music Videos
Thus, when we need to travel with the music, we unplug Drive 2 (External) and the server automatically plays from Drive 3.
Fixed IP & RDP Setup
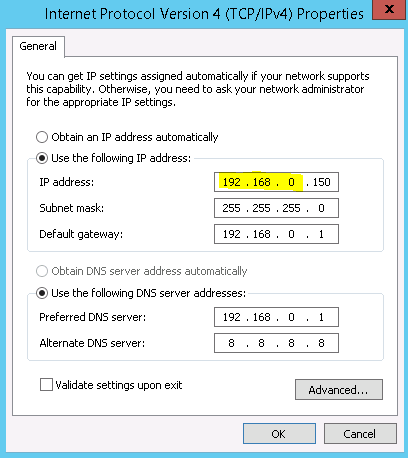
At this stage, you still need a keyboard and monitor to control the server. We want to get rid of this ASAP. The first thing to do is get a fixed IP. Why? Some computers/mobiles cannot connect to the server using it's friendly name (E.g. \\JOUBERTSERVER). We made ours 192.168.0.150 - remember only the last .bit should be different from that of your router.
Step 1: Open CMD ( Start -> Run -> 'CMD' )
Step 2: Type: 'ipconfig /all'
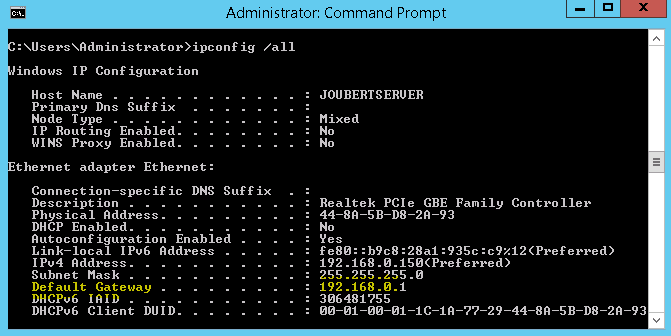
Step 3: Use the highlighted info under 'Default Gateway' to setup you're network adapter like shown - not only the highlighted part. ( Control Panel -> Network & Internet -> Network & Sharing Center -> Ethernet/Wifi -> Properties -> IPv4 )
You've got a fixed IP! :mates:
To setup Remote Desktop Connection, you need to activate it on your Server.
( Right click My Computer -> Advanced System Settings -> Remote -> Select Allow -> Check only with Network Level Authentication. )
No need to set users, you can use the normal Administrator Account.
Whoop! Now you can connect to it from almost anything! Windows PC's go to: ( Start -> Search: mstsc ) and login. Mac users can download Remote Desktop Connection, Android users: I use 2X RDP Client it seems to be quicker and easier than Microsoft's solution.
NOTE: If there's a pop-up saying the server has no certificate, just select don't ask me again and ignore it. We don't have a certificate manager in place, it isn't an issue for a simple home server.
File Sharing Setup
This allows certain folders or drives to be seen via the network.
Windows Server: Go to ( Server Manager -> Manage -> Add Roles and Features -> Install File and Storage Services )
Then you can go to shares and add folders or drives. We've setup our permissions so files can be read but not edited or written to. For PCs who should be able to add content and edit folders ( and also backup via FreeFileSync ) just go to the drive by typing:
\\SERVERNAME\driveletter$ - you can then sign in using your SERVER's local details ( We are not using a domain! )
Windows 7/8: Go to the folder you want to share -> Properties -> Sharing -> Share
I'm not sure if the same fancy permissions can be used.
Plex Server Setup
After Plex server has been installed it will be running in your task bar. Open it by rightclicking on it -> Media Manager
Go fiddle with the settings. Here are the main things we did:
Library -> Update my library automatically ( When changes are detected )
DLNA -> Disable ( Speed )
Scheduled Tasks -> Start at 1 am - 6 am. Check everything else, except refresh all libraries during maintenance.
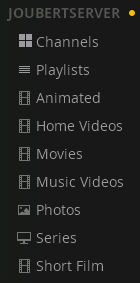
Then you can add some 'libaries' here's ours:
Then you can install Plex on your phone. We are using XBMC with the PlexBMC pluggin. - XBMC is much quicker on the Mac Mini, allows for more customization etc.
iTunes Home Sharing
On the Mac ( main client - HTPC ) we've got our music folder mounted and use VOX to play Flacs.
As for the other things, we use iTunes.
We have iTunes running on the server, with the library configured there. To enable Home Sharing:
( iTunes -> Prefrences -> Sharing -> Share on local network -> Share entire library -> Check update play counts )
Now on clients there is a little home icon to switch between libraries.
uTorrent Setup
To be able to add torrents from other devices: Go to: ( uTorrent -> Options -> Preferences -> Advanced -> Web UI -> Enable
Change the needed, we're using port 8112 to not interfere. Add download directories, so that when you ad, it can download to the directory where Plex indexes it with it's media types.
Windows Task Scheduler Setup
We want to be able to turn on the Server after Eishkom did their thing :baseball: and everything should start automatically without having to start it all. To do this, we're going to ad some Scheduled Tasks, and also login the PC automatically as administrator.
Task scheduler:
Create schedules for:
Login Automatically:
Go to ( Start -> Search: 'netplwiz' -> open that -> Select 'Administrator' -> Deselect Users must enter name & password -> Click ok -> enter password in popup )
BOOM! :flame: If Eishkom turns the power off, (and it comes back on lol) we pop the button on the server and in 12.7 seconds ( recorded ) everything is up and ready ( Windows + Programs + Logged in ) thanks to the SSD.
FreeFileSync Setup
Use this guide for the Clients and Server's backups.
( Open FreeFileSync -> Select a left and right side -> Click Green Settings icon -> Setup the Sync tipe -> Click the black save to batch icon )
You can now run that batch to backup, you can also launch that batch via the Task Scheduler - set some conditions so it doesn't backup while PC is being used.
Extra things to know
If using Windows Server and iTunes gives a pop-up saying 'Audio Configuration blah' (prohibiting iTunes to share library at start up ) download Virtual Audio Cable and install that.
File transfer speeds achieved with our setup are between 20MB/s - 40MB/s. This is fast enough for our use. The fact that we're streaming content ( via Plex & iTunes ) also helps. Having files on different drives also help speed.
If you build a different setup, make sure your motherboard has 1/100/1000 Ethernet.
----------------------------------
That wraps this up! I'm planning on making a video covering the setup of the server and also the client once I get the time. Please ask if you have any questions. :groovy: Enjoy your all-in-one base station for media!
I've been on the forums a good almost-month now. In that time I've fallen in love with all the great people here. :thumbs: Now I've decided to give back, as simple as it may be.
I know a lot of you prefer Linux / FreeNas for home servers. I too think it's more optimized and streamlined than Windows, but I've got a dad, who is forty, dos and that's that. So when he asked me to build us a home server it had to be running Windows.
Warning: Since this forum doesn't have a hide markup, or I simply cannot find it, this post is full of pictures.
Server Hardware Setup
Our server really isn't anything crazy. Not even an Core i3. The build cost us R3020 without Harddrives. I ordered all of the parts from takealot.com and two days later a huge box arrived. :rubhands:
To see the full build check my Youtube video: (Try not to laugh) Build a Home Server! [Part 1: The Build]
If you're not brave enough check out the part list:
| Part | Price |
| Intel Pentium G3240 @3.1GHz (Dual Core) | R775 |
| MSI H81M-P33 | R624 |
| Kingston 4GB Value Ram | R531 |
| Transcend SSD370 64GB | R654 |
| Thermaltake V2S Case + 350W Powersupply | R542 |
| Total: | R3126 (Inflation perhaps?  ) ) |
We added the following drives:
- 4TB Seagate Barracuda 5400RPM - R2000 Special at Dionwired
- 1TB Seagate USB 3.0 - Had this
- 1TB Seagate Barracuda 7200RPM - Had this, was added later.
Why I chose these parts:
CPU: Fast enough, low power consumption.
Motherboard: Quality seems good for the price. (Came with 2 SATA cables, perfect for the budget)
RAM: Enough for now, easy to upgrade.
SSD: Cheap, and quick. Not the best physical build though, very plasticy.(Not like you're playing cricket with it though?)
Case: Thermaltake's PSU's aren't bad, chose the case because I knew it didn't come with some Chinese PSU. Space for 6HDDs, 10 if converters are added.
Server Software Setup
So this is what you're actually here for, right? You should know, the Server is in a corner of an mostly unused room. Plugged into the router (Netgear 2200) and power cable, no monitor, using Remote Desktop Connection.
Basics of the software we're running:
- Windows Server 2012 R2 (Dad got from work - Windows 7/8 will do the same thing with a bit of tweaking)
- Plex Server - PlexBMC on the Clients/Plex on mobiles
- iTunes with Homesharing
- Windows file sharing - FreeFileSync on the clients to sync.
- FreeFileSync on the server for backups there.
- uTorrent - With WebUI
- Clamwin Antivirus - Runs on server operating systems, scheduled, simple.
- 4K Video Downloader - Simple Youtube downloader
- Windows Task Scheduler
How are Drives are utilized:
SSD: OS Install
Drive 1 (4TB): Media (Movies, Series, Animations, Home Movies, Music Videos)
Drive 2 (1TB) External: Music + Client Computer Backups
Drive 3 (1TB) Internal: Backup of: Drive 2 + Home Movies + Music Videos
Thus, when we need to travel with the music, we unplug Drive 2 (External) and the server automatically plays from Drive 3.
Fixed IP & RDP Setup
At this stage, you still need a keyboard and monitor to control the server. We want to get rid of this ASAP. The first thing to do is get a fixed IP. Why? Some computers/mobiles cannot connect to the server using it's friendly name (E.g. \\JOUBERTSERVER). We made ours 192.168.0.150 - remember only the last .bit should be different from that of your router.
Step 1: Open CMD ( Start -> Run -> 'CMD' )
Step 2: Type: 'ipconfig /all'
Step 3: Use the highlighted info under 'Default Gateway' to setup you're network adapter like shown - not only the highlighted part. ( Control Panel -> Network & Internet -> Network & Sharing Center -> Ethernet/Wifi -> Properties -> IPv4 )
You've got a fixed IP! :mates:
To setup Remote Desktop Connection, you need to activate it on your Server.
( Right click My Computer -> Advanced System Settings -> Remote -> Select Allow -> Check only with Network Level Authentication. )
No need to set users, you can use the normal Administrator Account.
Whoop! Now you can connect to it from almost anything! Windows PC's go to: ( Start -> Search: mstsc ) and login. Mac users can download Remote Desktop Connection, Android users: I use 2X RDP Client it seems to be quicker and easier than Microsoft's solution.
NOTE: If there's a pop-up saying the server has no certificate, just select don't ask me again and ignore it. We don't have a certificate manager in place, it isn't an issue for a simple home server.
File Sharing Setup
This allows certain folders or drives to be seen via the network.
Windows Server: Go to ( Server Manager -> Manage -> Add Roles and Features -> Install File and Storage Services )
Then you can go to shares and add folders or drives. We've setup our permissions so files can be read but not edited or written to. For PCs who should be able to add content and edit folders ( and also backup via FreeFileSync ) just go to the drive by typing:
\\SERVERNAME\driveletter$ - you can then sign in using your SERVER's local details ( We are not using a domain! )
Windows 7/8: Go to the folder you want to share -> Properties -> Sharing -> Share
I'm not sure if the same fancy permissions can be used.
Plex Server Setup
After Plex server has been installed it will be running in your task bar. Open it by rightclicking on it -> Media Manager
Go fiddle with the settings. Here are the main things we did:
Library -> Update my library automatically ( When changes are detected )
DLNA -> Disable ( Speed )
Scheduled Tasks -> Start at 1 am - 6 am. Check everything else, except refresh all libraries during maintenance.
Then you can add some 'libaries' here's ours:
Then you can install Plex on your phone. We are using XBMC with the PlexBMC pluggin. - XBMC is much quicker on the Mac Mini, allows for more customization etc.
iTunes Home Sharing
On the Mac ( main client - HTPC ) we've got our music folder mounted and use VOX to play Flacs.
As for the other things, we use iTunes.
We have iTunes running on the server, with the library configured there. To enable Home Sharing:
( iTunes -> Prefrences -> Sharing -> Share on local network -> Share entire library -> Check update play counts )
Now on clients there is a little home icon to switch between libraries.
uTorrent Setup
To be able to add torrents from other devices: Go to: ( uTorrent -> Options -> Preferences -> Advanced -> Web UI -> Enable
Change the needed, we're using port 8112 to not interfere. Add download directories, so that when you ad, it can download to the directory where Plex indexes it with it's media types.
Windows Task Scheduler Setup
We want to be able to turn on the Server after Eishkom did their thing :baseball: and everything should start automatically without having to start it all. To do this, we're going to ad some Scheduled Tasks, and also login the PC automatically as administrator.
Task scheduler:
- ( Start -> Search 'Task Scheduler' -> Create Task - not basic task! - )
- Give it a name, select only when logged in ( otherwise weird sessions are started etc. ), select Run with highest privileges.
- In triggers we're gonna do a few different ones but you'll have to figure that out.
- In actions you just point to the .exe / .bat you want to start
- You can ignore the conditions
- In settings make sure 'if task is already running' is set to DO NOT START A NEW INSTANCE.
Create schedules for:
- Starting uTorrent
- Starting iTunes
- Starting batch job for FreeFileSync ( Explanation will be under this )
Login Automatically:
Go to ( Start -> Search: 'netplwiz' -> open that -> Select 'Administrator' -> Deselect Users must enter name & password -> Click ok -> enter password in popup )
BOOM! :flame: If Eishkom turns the power off, (and it comes back on lol) we pop the button on the server and in 12.7 seconds ( recorded ) everything is up and ready ( Windows + Programs + Logged in ) thanks to the SSD.
FreeFileSync Setup
Use this guide for the Clients and Server's backups.
( Open FreeFileSync -> Select a left and right side -> Click Green Settings icon -> Setup the Sync tipe -> Click the black save to batch icon )
You can now run that batch to backup, you can also launch that batch via the Task Scheduler - set some conditions so it doesn't backup while PC is being used.
Extra things to know
If using Windows Server and iTunes gives a pop-up saying 'Audio Configuration blah' (prohibiting iTunes to share library at start up ) download Virtual Audio Cable and install that.
File transfer speeds achieved with our setup are between 20MB/s - 40MB/s. This is fast enough for our use. The fact that we're streaming content ( via Plex & iTunes ) also helps. Having files on different drives also help speed.
If you build a different setup, make sure your motherboard has 1/100/1000 Ethernet.
----------------------------------
That wraps this up! I'm planning on making a video covering the setup of the server and also the client once I get the time. Please ask if you have any questions. :groovy: Enjoy your all-in-one base station for media!